Kanban is one of the most popular Lean workflow management methods for defining, managing, and improving services that deliver knowledge work. It helps you visualize work, maximize efficiency, and improve continuously. Work is represented on Kanban boards, allowing you to optimize work delivery across multiple teams and handle even the most complex projects in a single environment.
Originating from manufacturing, it later became a territory claimed by Agile software development teams. Recently, it has begun to gain recognition from business units across various industries.
As more and more people hear about Kanban, multiple questions arise:
- What exactly is Kanban?
- What are the Kanban principles and practices?
- What are the benefits of adopting Kanban?
Here are the key points you need to know about the method and its practical application.
A Brief Introduction to Kanban's History
Kanban Definition
The Japanese word "kanban", meaning "visual board" or a "sign", has been used in the sense of a process definition since the 1950s. It was first developed and applied by Toyota as a scheduling system for just-in-time manufacturing. On the other hand, the capitalized term "Kanban" is known and associated with the emergence of the "Kanban Method," which was first defined in 2007.
The Birth of Kanban
Initially, it arose as a scheduling system for lean manufacturing, originating from the Toyota Production System (TPS). In the late 1940s, Toyota introduced "just in time" manufacturing. The approach represents a pull system. This means production is driven by customer demand rather than the traditional push model of producing goods and pushing them to market.
Their unique production system laid the foundation of Lean manufacturing, or simply Lean. Its core purpose is to minimize waste activities without sacrificing productivity. The main goal is to create more value for the customer without generating more costs.
 The original Kanban System, Source: TOYOTA Global Website
The Kanban Method
At the beginning of the 21st Century, key players in the software industry quickly realized how Kanban could positively change the way products and services were delivered.
With an increased focus on efficiency and by harnessing advances in computing technology, Kanban left the automotive industry's realm and was successfully applied to other complex commercial sectors such as IT, software development, R&D, and others.
Indeed, what we now recognize as the Kanban method emerged at the beginning of 2007. It is the result of years of testing, experience, and joint efforts by leading figures in the Lean and Agile communities.
You can start building your Kanban system by setting up the most straightforward Kanban board with three basic columns – "Requested", "In Progress", and "Done". When properly constructed, managed, and functioning correctly, it serves as a real-time information repository, highlighting bottlenecks within the system and other factors that might disrupt smooth workflows.
Let's discover more about the fundamental Kanban principles and practices.
10 Years Kanban Experience In 1 Free Book.
Project Manager's Guide to Kanban
The 6 Core Kanban Principles
The Kanban method is based on six foundational change management and service delivery.
-
Start with what you do now: Kanban is about continuous improvement, but it begins with understanding your current processes and workflows.
-
Agree to pursue incremental, evolutionary change: Rather than attempting a large-scale transformation all at once, Kanban advocates small, incremental changes that build on one another over time.
-
Encourage leadership at all levels: Kanban is not just for managers or team leads, but for everyone involved in the work. Anyone can take leadership and suggest improvements based on their observations.
-
Focus on customer needs and expectations: Kanban helps you understand your customers' needs and expectations, elevating the quality of the services you provide and the value you create.
-
Manage the work, not the workers: Kanban respects team members' existing roles and responsibilities and empowers them to self-organize around the work.
-
Regularly review the network of services: Kanban encourages collaboration and encourages team members to share their observations, ideas, and feedback for improving the work through regular reviews of the entire network of services.
What Are the Kanban Practices?
For a successful Kanban implementation, the method relies on six essential practices:
-
Visualizing the workflow: Creating a visual representation of the workflow helps to identify bottlenecks, visualize the flow of work, and make the work more transparent.
-
Limiting work in progress: Limiting the amount of work in progress helps to prevent multitasking and improve focus on completing one task at a time, thereby improving efficiency and reducing lead time.
-
Managing flow: Kanban aims to help in optimizing flow, which can be achieved by monitoring flow metrics, identifying and addressing bottlenecks, and continuously improving the workflow.
-
Making process policies explicit: Defining and communicating process policies clearly helps to ensure that everyone understands how work is supposed to be done, which reduces misunderstandings and promotes consistency.
-
Implementing feedback loops: Kanban emphasizes the importance of getting feedback from customers, stakeholders, and team members as a way to identify areas for improvement.
-
Improving collaboratively: Kanban is a continuous improvement process that encourages collaboration and experimentation to identify and solve problems, improve continuously, and evolve their processes to better meet the needs of their customers.
See work. Fix flow. Deliver faster.
Top 6 Benefits of Kanban
According to the 1st State of Kanban report, the leading reasons for adopting the Kanban method are the need for enhanced visibility of work and continuous improvement. Let's reveal some more of the benefits of using Kanban today.
Image Credit: State of Kanban
- Increased visibility of the flow
- Improved delivery speed
- Alignment between goals and execution
- Improved predictability
- Improved dependencies management
- Increased customer satisfaction
Increased Visibility of the Flow
At its core, Kanban focuses on visualizing every single work item. This way, the Kanban board turns into a central informational hub, and everyone is on the same page. All tasks are visible, and they never get lost, which brings transparency to the whole work process. Every team member can have a quick update on the status of every project or task.
Improved Delivery Speed
Kanban offers multiple ways for project managers to closely monitor and make informed analyses of the distribution of work. With a clear view over the work items completed for a certain period of time, the stages where tasks spend the longest, and bottlenecks are easy to identify. Teams are enabled to tackle these challenges to improve their workflow and, ultimately, their delivery rate.
Alignment between Business Goals and Execution
By promoting transparency, encouraging feedback, and holding regular review meetings, Kanban practices align the company's strategic goals with the teams' day-to-day work. This alignment between business direction and execution enhances an organization's agility. It allows teams to adapt to changing priorities and reorganizations due to changes in the market or customers' requirements.
Improved Predictability
Once you create a Kanban board and start accumulating work items on it, you'll be able to understand your process in depth with flow metrics and improve your planning. Analyzing the time tasks spend in your workflow (cycle time) will enable you to improve your predictions on how much work you can deliver in the future. Understanding your delivery rate consistency (throughput) will make your forecasts more accurate and your decisions based on historical data, which is fundamental to planning with Kanban.
Improved Ability to Manage Scale and Dependencies
The intrinsic Kanban practice of visualization is also applied when it comes to mapping and managing dependencies. Starting with what you do now means visualizing the present dependencies and managing the flow between them. Managing dependencies provides both insights into the present state of a workflow and ideas for improvement. On the other hand, it also enables full transparency for strategic management over the workflow and the existing links between teams.
Increased Customer Satisfaction
The origin of the Kanban method - the pull system it is based on implies that work is done when there's a demand. In other words, Kanban navigates you to reduce waste by working solely on tasks that are needed at present. Furthermore, by applying visualization techniques and introducing work-in-progress limits to the process, you will ensure that the end result is fine-tuned to your customer's expectations.
Scrum vs. Kanban
The most important difference between Kanban and Scrum is that the former is a method, while the latter is a framework. As an Agile methodology, Kanban builds a continuous delivery model where teams release value as soon as they are ready, while Scrum organizes work in Sprints. Applying either one depends on the nature of your process, however, it can be said that Kanban offers a more tailor-made approach while Scrum relies on predetermined rules. Another key distinguishing characteristic between the two is the mindset and founding belief systems of Scrum and Kanban.
| |
Kanban |
Scrum |
| Nature |
Kanban is an adaptive method |
Scrum is a prescriptive framework |
| Principles |
1. Start with what you do now
2. Agree to pursue evolutionary change
3. Encourage acts of leadership at all levels
4. Focus on customer's needs
5. Manage the work
6. Regularly review the network of services |
1. Empiricism
2. Transparency
3. Inspection
4. Adaptation |
| Cadences |
- Team-level cadences
- Service-oriented cadences |
- Sprint with a fixed length
- Sprint planning
- Daily Scrum
- Sprint Review
- Sprint Retrospective |
| Roles |
- Service Delivery Manager*
- Service Request Manager*
(*no pre-defined roles are required) |
- Product Owner
- Scrum Master
- Development Team |
| Metrics |
- Cycle Time
- Throughput
- Work In Progress |
- Velocity
- Planned Capacity |
Applying Kanban Across the Organization for Enterprise Agility
By nature, Kanban is an adaptive methodology, meaning that it is applicable to all organizational layers. You can use connected Kanban boards to map the management of your portfolios and connect strategy to execution. With the help of the Portfolio Kanban concept, organizations can reap the benefits of Kanban's principles and practices across multiple management levels.
The Portfolio Kanban approach can be used in four different forms:
- Team-level Portfolio Kanban
- Portfolio Kanban on the Project/Product level
- Portfolio Kanban on the Program level
- Portfolio Kanban on the Strategic level
Portfolio Kanban Scheme
How to Build Your Kanban Workflow in 6 Steps?
There are many methods and techniques to improve efficiency with process mapping, and most can be very useful for this task. In the following paragraphs, we will guide you through a straightforward process to help you build and manage your kanban workflow effectively.
1. Define your first and last step
To give the process a shape, we start by outlining the first and the last steps of the workflow. The first step is represented by the “requested” state and the last by the “done” state. It is important to shun away from the “almost done” trap.
2. Outline the steps in-between
Make a list of all the steps you go through after you have started to work on a given item and before finishing it. Keep in mind that this is not the final version of your board, and you will edit it many times as your experience and process evolve.
3. Determine the level of details
It is important to determine how deep into the details your process will go. Too complex flows could harm your productivity and create confusion in your team. A rule of thumb is to add a step only if it repeats itself in time. If a given step occurs 1 time in 100 cases, it is not a good idea to include it.
4. Leave a buffer column(s)
This feature is crucial for every board. Buffer columns are used when a task depends on something or someone else. For instance, if you're waiting for approval from Upper Management and can't speed up the process, you can place these tasks in a buffer column to track their waiting time.
Use a buffer column when transitioning between functional areas or sub-processes. In Businessmap, we employ a buffer column when the Marketing team sends a purchase request to Finance. While buffer columns would not be necessary ideally, they are helpful in managing the challenges described.
5. Determine the shape of your process
Is your process linear or vertical?
The columns of the kanban board represent the horizontal (linear) process of your flow. The swimlanes, on the other side, represent its vertical aspects. The most common case of verticals is when we have multiple teams that are part of the same department. All verticals on the board must have similar or, in the best–case scenario, the same process applied.
6. Continuous improvement
Kanban is a continuous journey with no endpoint. At its core lies the kaizen culture, a philosophy of ongoing improvement. Every process can always be refined further, with no exceptions. Therefore, remember to enhance your work process whenever necessary regularly.
Businessmap is the most flexible software
to gain full work visibility across teams & portfolios
Best Practices to Continuously Improve Your Workflow
Here are some explicit ways to pursue continuous improvement through kanban practices.
Lower WIP Limits
Kanban promotes incremental change, and thus setting drastically low WIP limits could be stressful for the team. It is better to start by choosing the current number of tasks in the In Progress area and ensure they are not exceeded. Then, tasks will move faster toward completion, and you will be able to reduce the WIP limits.
Ultimately, the goal is to have one item per team member. You can start with two tasks per person. For example, if your team has five people, the WIP limit should be ten tasks.
Adjust Board Structure to the Changes in Your Process
Your columns are not set in stone. Your process is evolving. New activities emerge, some become obsolete, and the board should reflect these changes. However, new columns and swimlanes should not affect the WIP limits if there are no changes in the team's size. It is also important from an analytical point of view that your board reflects exactly your kanban workflow; otherwise, the analytics will not present correct data.
Aim for Shorter Cycle Times
Your goal is to achieve shorter cycle times. This means that a card travels faster from the In Progress column to the Done column. Most modern workflow management software solutions are equipped with advanced analytics modules to help you monitor your workflow and analyze your results. Some of the most valuable tools are the cycle time chart, heat map for cycle time, and cumulative flow diagram, which could help you improve.
Remember to experiment with editing your kanban workflow until you find the formula that best fits your team's needs. It's also important to analyze your progress over time and compare it with previous periods. Use analytical tools to monitor your performance and achieve sustainable growth.
What Are the Main Kanban Terms You Should Know?
At its core, Kanban is a work method that helps you optimize the flow of value through your value streams from ideation to customer. Although it looks like an easy way to improve your work processes, Kanban is more than visualizing your work. You need to pay attention to detail and get familiar with the fundamental Kanban terms and artifacts if you want to benefit from applying the method.
Here is a short Kanban glossary that will help you get started.
-
Kanban board: A Kanban board is one of the Kanban method's key components and is where you visualize all work items. It should be divided into a minimum of 3 columns – Requested, In Progress, Done, representing different process stages.
-
Kanban card: Kanban cards represent the different work items moving through a Kanban board. They contain important details about the tasks, such as description, deadline, size, assignees, etc.
-
Columns: They split the Kanban board vertically, and each of them represents a different stage of the workflow. Each Kanban board has 3 default columns: Requested, In Progress, Done. Depending on the complexity of a work process, these three stages can be divided into many smaller sub-columns.
-
Swimlanes: Horizontal lanes that split a Kanban board into sections. Teams use them to visually separate different work types on the same board and organize homogenous tasks together.
-
Cycle Time: Cycle time begins at the moment when a new task enters the "in progress" stage of your workflow, and somebody is actually working on it.
-
Lead Time: Lead time starts at the moment a new task is being requested (it doesn't matter if somebody is actually working on it) and ends with its final departure from the system.
-
Throughput: The number of work items passing through (completed) a system or process over a certain period. The throughput is a key indicator showing how productive your team is over time.
-
Work in Progress (WIP): This is the amount of work you are currently working on, and it is not finished yet.
-
WIP limits: Limiting work in progress means limiting the number of tasks your team can work on simultaneously to avoid overburdening and context-switching.
-
Classes of Service: Set of policies that help Agile teams prioritize work items and projects.
-
Kanban Cadences: Cyclical meetings that drive evolutionary change and "fit for purpose" service delivery.
-
Kanban software: Refers to a digital system that allows the practical application of the Kanban practices and principles to be used by various teams and organizations of all sizes.
Kanban in a Nutshell
A Kanban system is more than sticky notes on the wall. The easiest way to understand Kanban is to embrace its philosophy and apply it to your daily work. If you read, understand, and resonate with its core principles, the practical transition would seem logical and even inevitable.
Visualizing workflow, setting WIP limits, managing flow, ensuring explicit policies, and continuously improving will take your process far beyond what you could think. Remember to organize regular feedback loops, and all these pieces together will reveal Kanban's real power.
Businessmap is the most flexible software
to gain full work visibility across teams & portfolios
In Summary
Trying to learn what is Kanban could be hard at first but now that you know what it is, you can make the most out of the main benefits of Kanban:
- Physical and digital Kanban boards help you visualize your work.
- Kanban is easy to adopt - just start with what you have.
- WIP limits empower you to become more efficient.
- The Kanban principles and practices offer an evolutionary path toward agility without disrupting the current processes.


 The original Kanban System, Source: TOYOTA Global Website
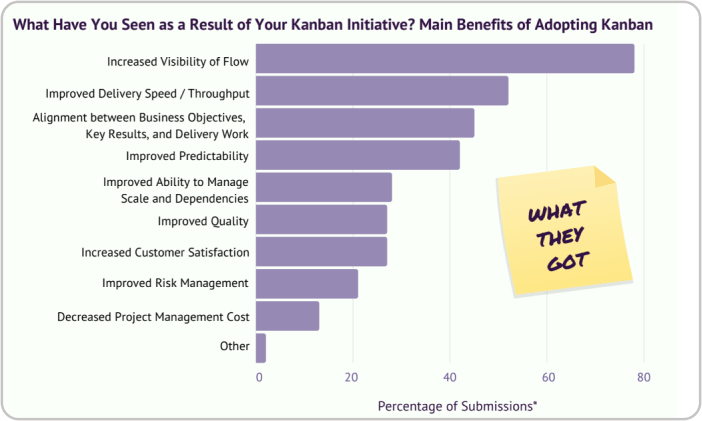 Image Credit: State of Kanban
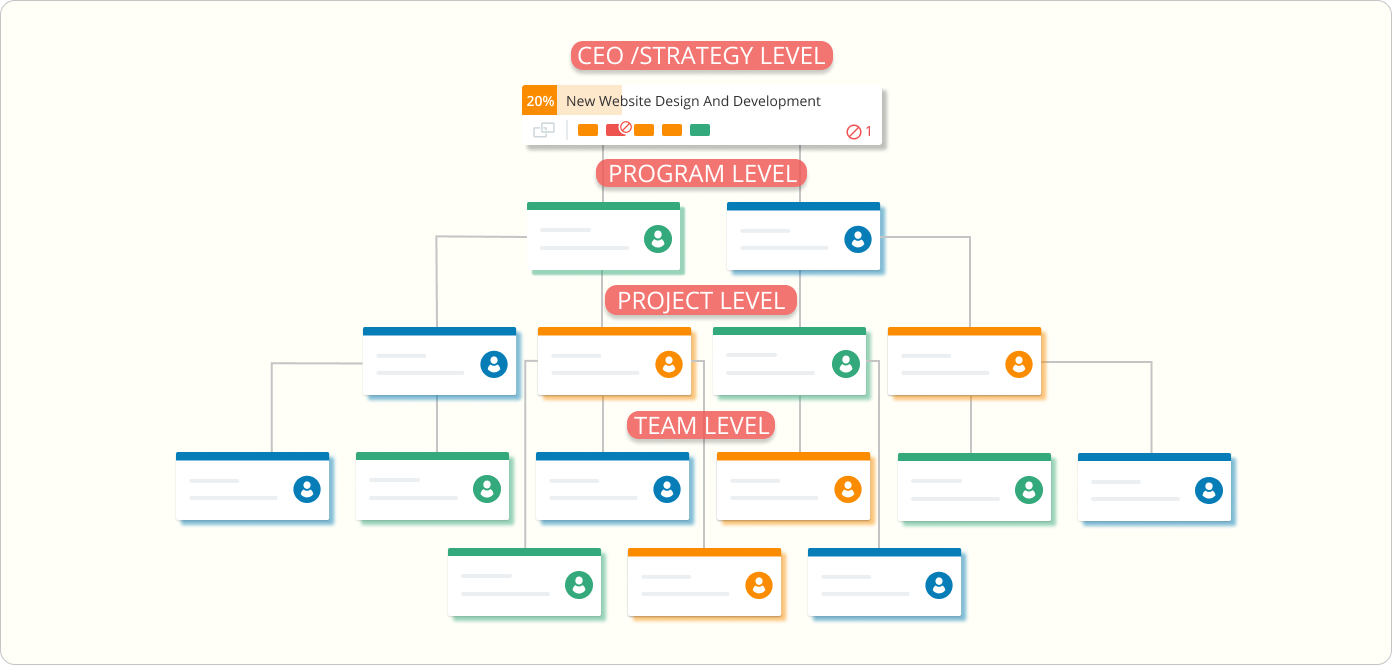 Portfolio Kanban Scheme